> For the complete documentation index, see [llms.txt](https://docs.lightpost.app/llms.txt). Markdown versions of documentation pages are available by appending `.md` to page URLs; this page is available as [Markdown](https://docs.lightpost.app/other-features/lightpost-print.md).

# Lightpost Print

Set up Lightpost Print and choose between Local Printing and Internet Printing for label printers.

Lightpost Print is a desktop app for macOS and Windows that sends Lightpost labels directly to a label printer installed on the computer. It prints through the computer's normal printer system, which allows labels to print without opening the browser's print dialog.

Lightpost Print can be used in two ways:

* **Local Printing** sends the label from a Lightpost website open on the same computer as Lightpost Print.
* **Internet Printing** lets an authorized Lightpost device send a label to a registered printer at another computer.

{% hint style="info" %}
Lightpost Print must be open on the computer connected to the label printer. The printer must also be installed in macOS or Windows before it will appear in Lightpost Print.
{% endhint %}

## Before You Begin

1. Download and install Lightpost Print on the computer that will communicate with the label printer.
2. Install the printer manufacturer's driver or software.
3. Add the printer in the computer's **Printers & Scanners** settings and confirm that the computer can see it.
4. Connect the printer and turn it on.
5. Open Lightpost Print.

## Set Up the Printer

Open the **Printer Setup** tab in Lightpost Print, then:

1. Select **Refresh Printers** if the printer is not already listed.
2. Choose the printer under **Default printer**.
3. Choose the label size loaded in the printer. Child Check-in labels use **2 1/8" × 2 3/4"** labels.
4. Select **Print a Test Label**.

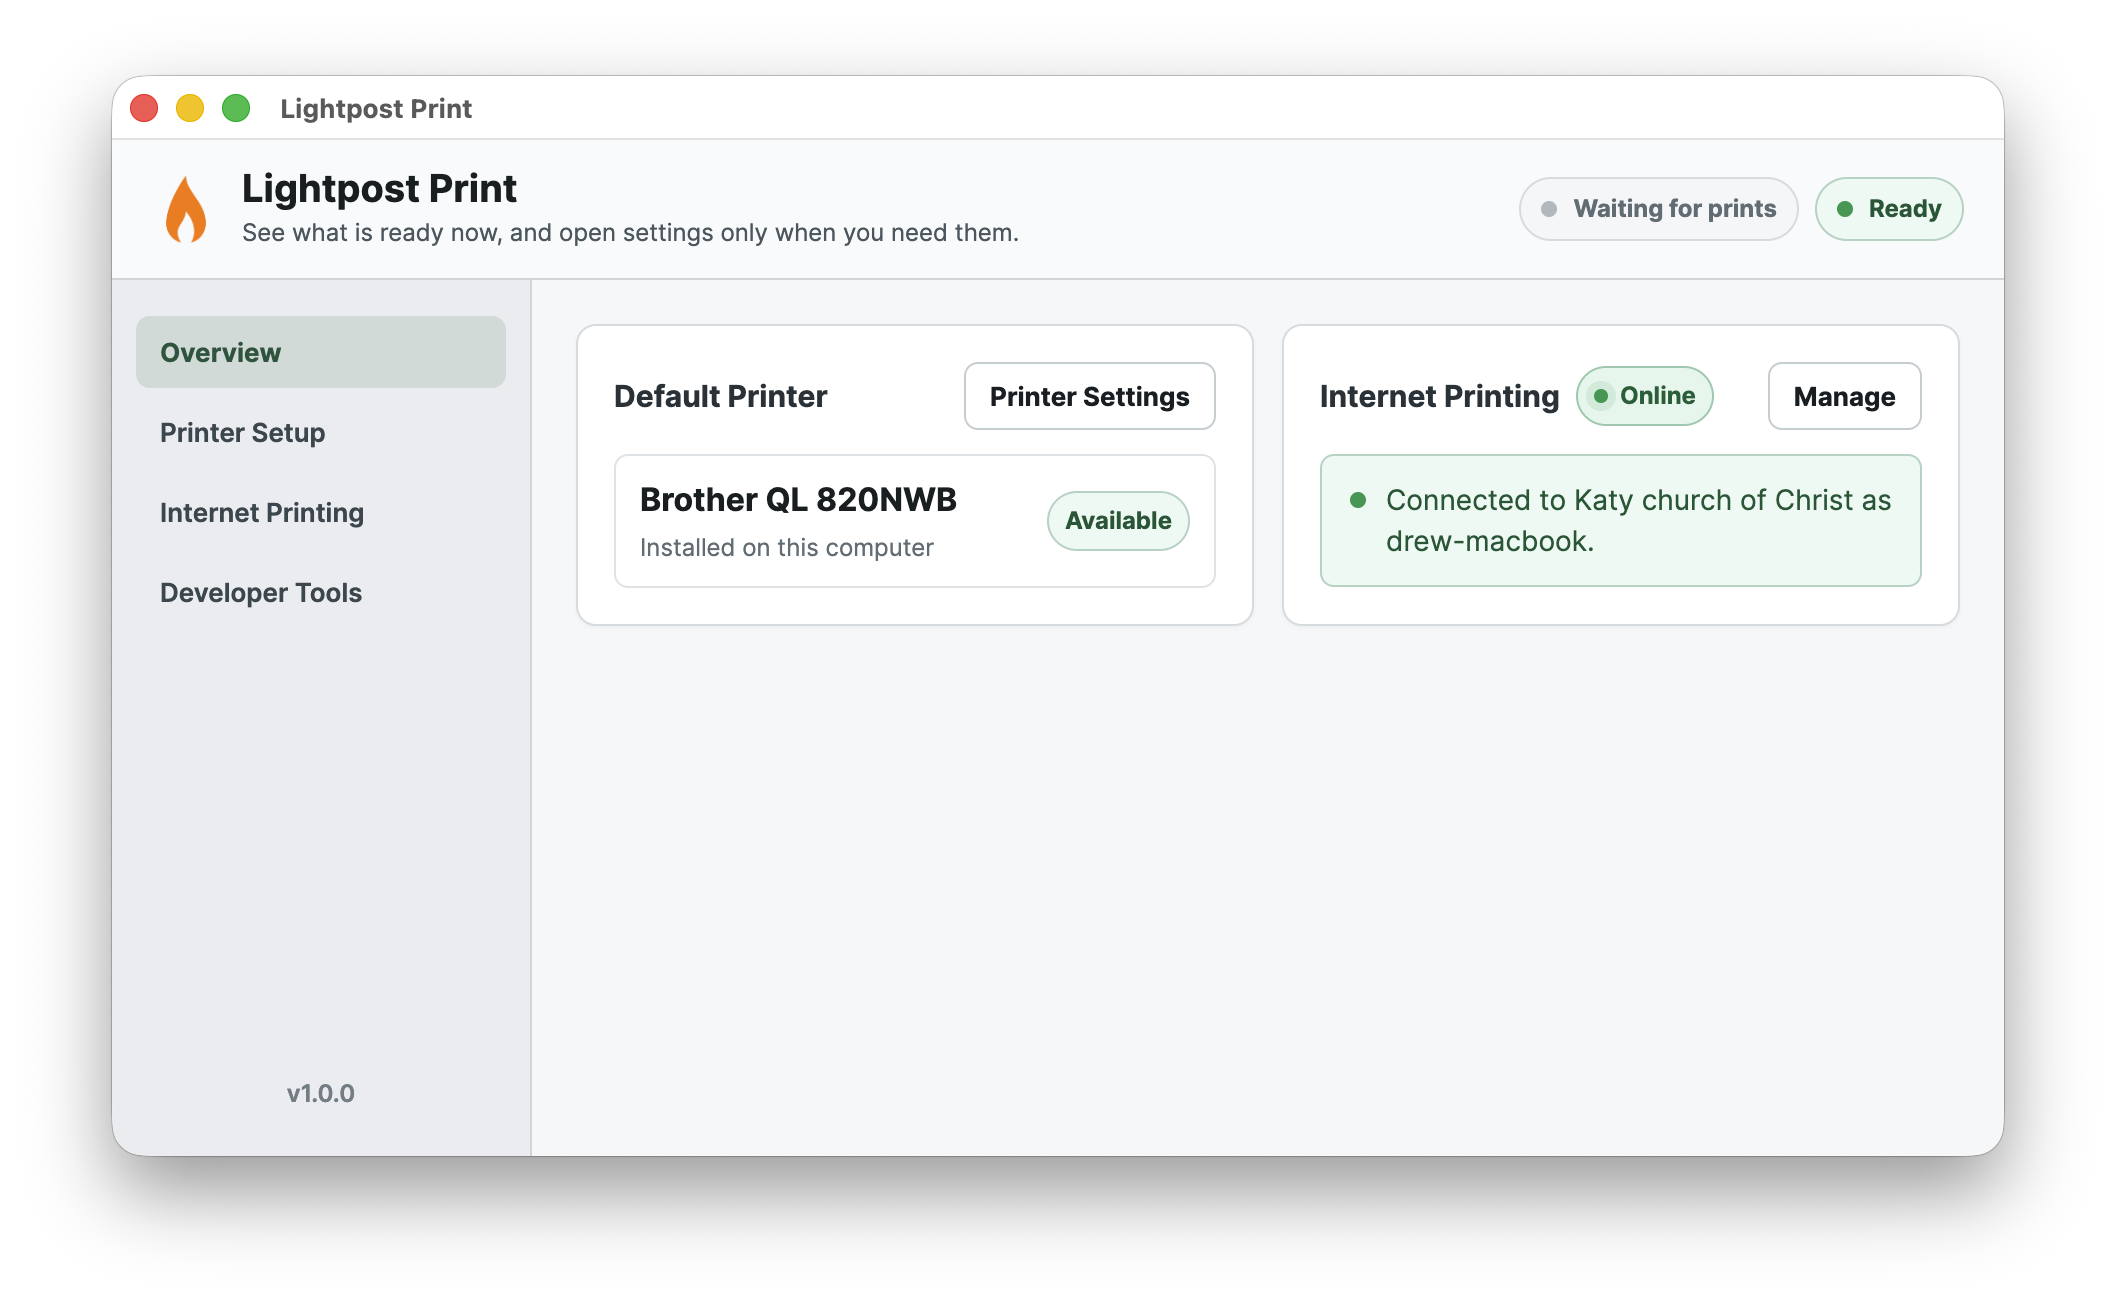
The **Overview** tab shows the current default printer and its status. If Lightpost Print reports the printer as offline or unavailable, confirm the printer is powered on and connected, then check its status in the computer's printer settings.

<figure><img src="https://585820897-files.gitbook.io/~/files/v0/b/gitbook-x-prod.appspot.com/o/spaces%2FG1WcD54zAozfrANJAahi%2Fuploads%2Fgit-blob-27250b85f2acd1a8cd9e2958f723dea8708cb140%2Flightpost-print-overview.png?alt=media" alt="Lightpost Print Overview showing an available default printer and an online Internet Printing connection"><figcaption><p>The Overview shows whether the default printer is available and whether Internet Printing is connected and online.</p></figcaption></figure>

## Local and Internet Printing

Both options use the same Lightpost Print app and the computer's printer driver. The difference is where the print request begins.

|                                   | Local Printing                               | Internet Printing                                                        |
| --------------------------------- | -------------------------------------------- | ------------------------------------------------------------------------ |
| **Where check-in runs**           | In a web browser on the printer computer     | On another signed-in computer, tablet, or mobile device                  |
| **Lightpost option**              | **Lightpost Print (This Computer)**          | **Registered Lightpost Printer**                                         |
| **Account registration required** | No                                           | Yes                                                                      |
| **Browser permission**            | Local Network Access may be required         | Not required on the device sending the label                             |
| **Best for**                      | A fixed check-in computer beside the printer | Mobile check-in, several check-in stations, or a printer in another room |

You can configure both options on the same installation. Choosing a default printer for Local Printing does not automatically make that printer available over the internet. Internet printers are shared with the Lightpost account only after someone explicitly registers them.

## Printing Directly From a Mobile Device

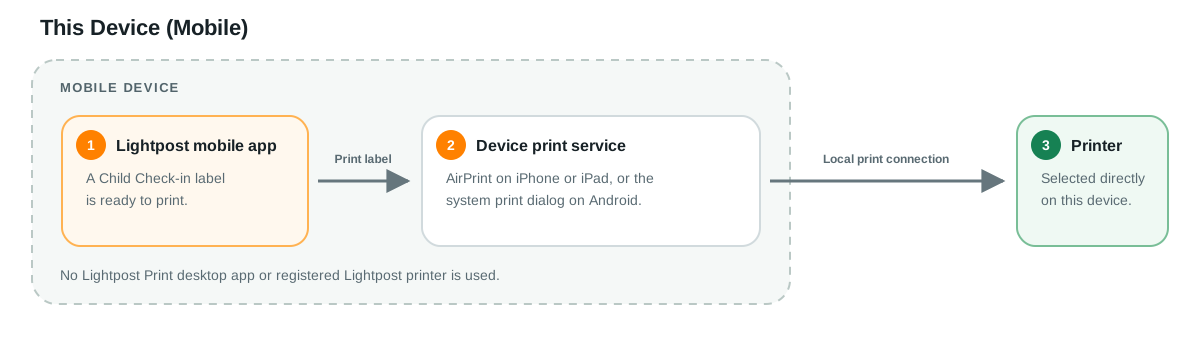
The Lightpost mobile app also offers **This Device**. This option uses AirPrint on iPhone or iPad or the system print dialog on Android to send the label directly to a printer available to that device. It is separate from both Lightpost Print options and does not require the Lightpost Print desktop app or account printer registration.

<figure><img src="https://585820897-files.gitbook.io/~/files/v0/b/gitbook-x-prod.appspot.com/o/spaces%2FG1WcD54zAozfrANJAahi%2Fuploads%2Fgit-blob-19e44a14cbf8c59545859cc0b8b21367bc0f9a10%2Flightpost-mobile-local-flow.svg?alt=media" alt="Flow from the Lightpost mobile app through AirPrint or the Android system print dialog directly to a local printer without using Lightpost Print"><figcaption><p>This Device prints through the mobile device's normal print service and does not use Lightpost Print.</p></figcaption></figure>

## Local Printing

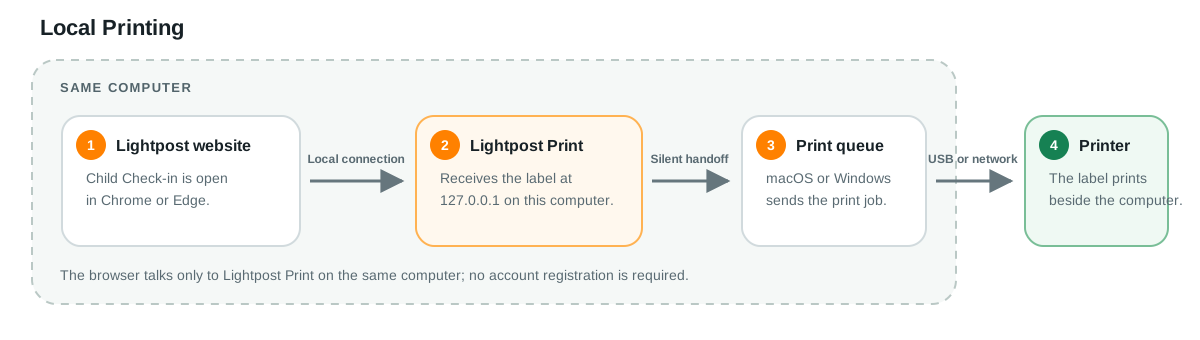
Use Local Printing when the Lightpost website and Lightpost Print are open on the same computer.

<figure><img src="https://585820897-files.gitbook.io/~/files/v0/b/gitbook-x-prod.appspot.com/o/spaces%2FG1WcD54zAozfrANJAahi%2Fuploads%2Fgit-blob-6eb3c21b4fd0aba0f06ba1c18877f1522b67f6d6%2Flightpost-print-local-flow.svg?alt=media" alt="Local Printing flow from the Lightpost website to Lightpost Print on the same computer, through the computer print queue, and to the label printer"><figcaption><p>Local Printing keeps the browser-to-app connection on the printer computer.</p></figcaption></figure>

### Set Up Local Printing

1. Complete the printer setup and test print in Lightpost Print.
2. Keep Lightpost Print open.
3. Open or reload your Lightpost website in Chrome or Edge.
4. If the browser asks for **Local Network Access**, select **Allow**. This permission lets the Lightpost website communicate with Lightpost Print on the same computer.
5. In the Child Check-in website, select **Lightpost Print (This Computer)** as the printer service.
6. Select the printer and print a label.

{% hint style="warning" %}
If Local Network Access was blocked, open the site controls beside the Lightpost address, change **Local Network Access** to **Allow**, and reload the page. If the permission is not shown, reset the Lightpost site's permissions in the browser's Privacy and security settings and try again.
{% endhint %}

## Internet Printing

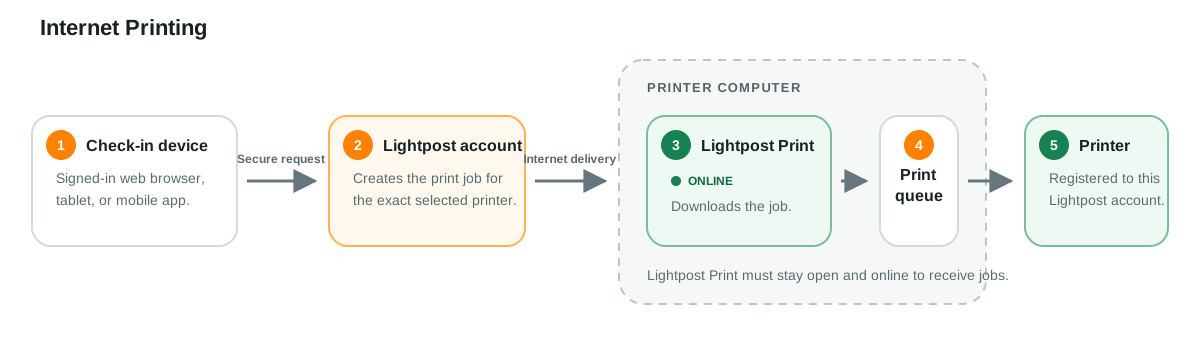
Use Internet Printing when check-in happens on a different device from the printer computer. The computer running Lightpost Print receives the label securely through the Lightpost account and sends it to the local printer.

Internet Printing is the Lightpost Print option to use with the Lightpost mobile app.

<figure><img src="https://585820897-files.gitbook.io/~/files/v0/b/gitbook-x-prod.appspot.com/o/spaces%2FG1WcD54zAozfrANJAahi%2Fuploads%2Fgit-blob-fa9eb53663e4451067264652e72cfe85d9a8eafc%2Flightpost-print-internet-flow.svg?alt=media" alt="Internet Printing flow from a signed-in web or mobile device through the Lightpost account to Lightpost Print and an explicitly registered label printer"><figcaption><p>Internet Printing sends the job through the Lightpost account to the exact registered printer.</p></figcaption></figure>

### 1. Create a Registration Code

An account administrator with permission to manage Account Settings should:

1. Open **Account Settings > Printers** in Lightpost.
2. Select **Create Code**.
3. Select **Create Registration Code**.
4. Copy the code when it appears.

The code can be used once, expires after four hours, and is displayed only when it is created. If it is lost or expires, create a new code.

### 2. Connect Lightpost Print

On the computer connected to the label printer:

1. Open Lightpost Print and select **Internet Printing**.
2. Enter the registration code.
3. Enter a recognizable installation name, such as **Children's Check-in Desk** or **Welcome Center**.
4. Select **Connect This Installation**.

After connecting, the app shows the Lightpost account name and its internet connection status.

### 3. Register Printers

1. Select each local printer that the Lightpost account should be allowed to use.
2. Select **Register Selected Printers**.
3. Confirm that the Internet Printing status shows **Online**.

Only the printers selected in this step are registered. Lightpost does not automatically share every printer installed on the computer.

### 4. Use the Registered Printer

On the Child Check-in website:

1. Select **Registered Lightpost Printer** as the printer service.
2. Select the registered printer. The list includes the printer name and its Lightpost Print installation name.
3. Print the label as usual.

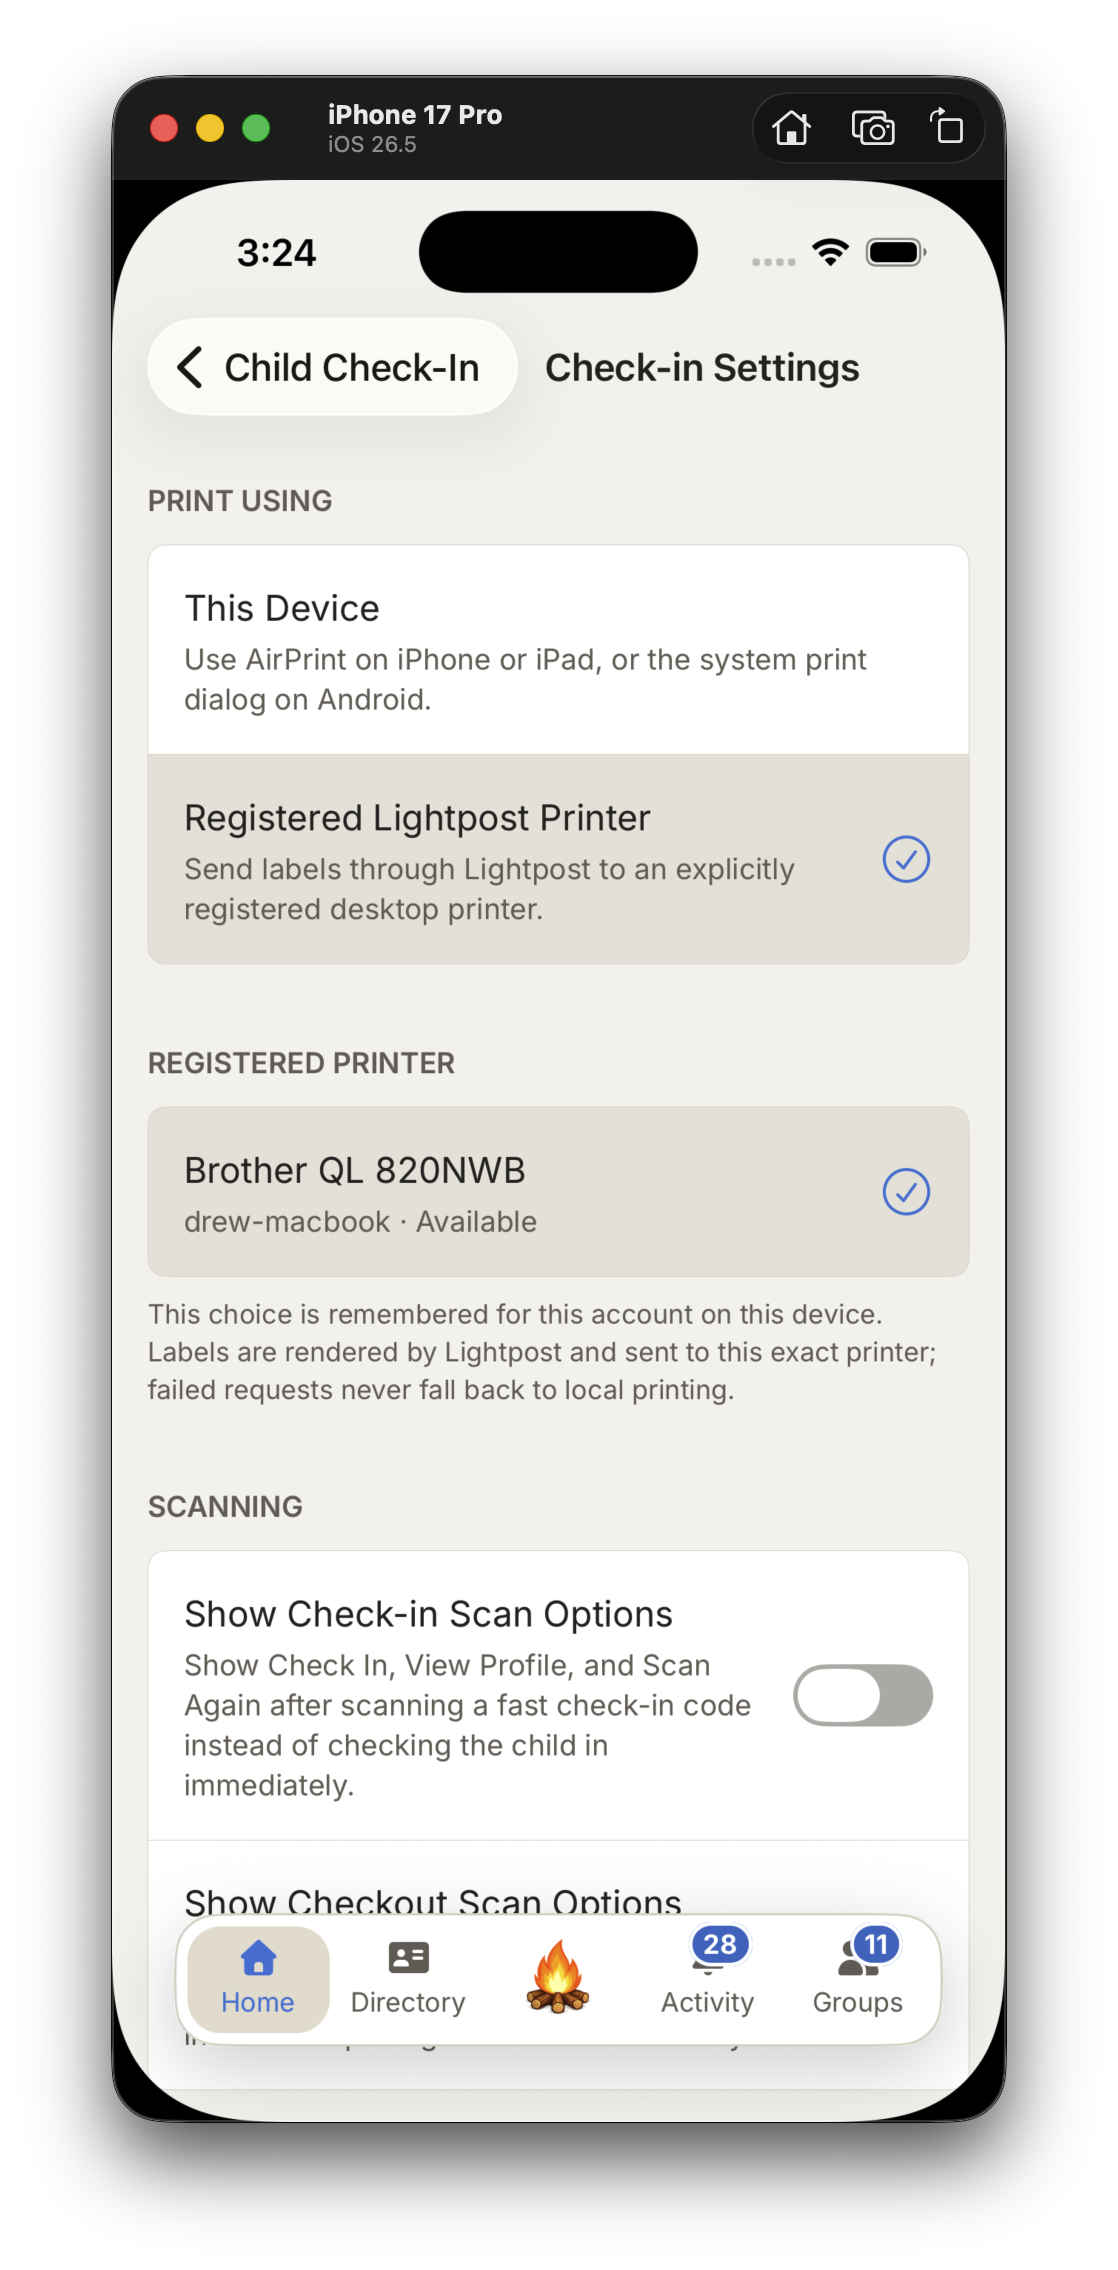
In the Lightpost mobile app, open **Child Check-In > Settings**, choose **Registered Lightpost Printer**, and select the registered printer for that device. The **This Device** option uses AirPrint on iPhone or iPad or the system print dialog on Android; it does not use Lightpost Print.

<div align="center"><figure><img src="https://585820897-files.gitbook.io/~/files/v0/b/gitbook-x-prod.appspot.com/o/spaces%2FG1WcD54zAozfrANJAahi%2Fuploads%2Fgit-blob-66829915809f92ffd432e7d63ef95f1cf978a4e1%2Flightpost-print-mobile-registered-printer.png?alt=media" alt="Lightpost mobile Child Check-In settings with Registered Lightpost Printer and Brother QL-820NWB selected" width="188"><figcaption><p>Choose Registered Lightpost Printer, then select the exact printer that should receive labels from this device.</p></figcaption></figure></div>

The choice is remembered for the account on that device. If an Internet Printing request fails, Lightpost reports the failure and does not silently switch to **This Device** or another printer.

{% hint style="info" %}
For dependable printing, the printer computer, Lightpost Print, and the printer should all be online and available before check-in begins. A label sent while the installation is offline may remain queued only briefly before it expires.
{% endhint %}

## Manage Internet Printers

Open **Account Settings > Printers** to:

* See connected Lightpost Print installations and whether they are online.
* See the printers intentionally registered from each installation.
* Review recent print history and job status.
* Retry an eligible failed job or cancel a queued job.
* Unregister a printer without disconnecting the entire installation.
* Disconnect an installation from the Lightpost account.
* Revoke an unused registration code.

Disconnecting an installation or unregistering a printer removes it from the choices available to Lightpost users. It does not remove the printer from the computer itself.

## Troubleshooting

### The printer is not listed in Lightpost Print

Confirm that the printer appears in the computer's **Printers & Scanners** settings. Install or update the manufacturer's driver if necessary, then select **Refresh Printers** in Lightpost Print.

### Local Printing is unavailable

Keep Lightpost Print open, allow Local Network Access for the Lightpost website, and reload the page. Then explicitly select **Lightpost Print (This Computer)** in Child Check-in.

### A registered printer is offline or unavailable

On the printer computer, confirm that:

* Lightpost Print is open.
* The Internet Printing tab shows the installation is connected.
* The computer has internet access.
* The printer is powered on and available in the computer's printer settings.
* The printer was selected and registered under **Internet Printing**.

An account administrator can review the result under **Account Settings > Printers > Print History**.

### The label size is wrong

Open **Printer Setup**, choose the label size that is physically loaded, and print another test label. For Child Check-in, use **2 1/8" × 2 3/4"**.